External Hotspot API for Authorization Clients
As of March 2025, Network Application 9.1.105 is available in Early Access, with full API documentation and key generation now ready. You can access the documentation and generate your API keys in Network > Control Plane > Integrations.
Components
- Client Device
- UniFi Access Point
- UniFi Switch and Cloud Gateway
- External Portal Server (Hotspot/Captive Portal)
Authorization Process Overview
In a standard UniFi Network setup, clients can connect to an SSID configured with Hotspot > Captive Portal. When a guest joins the network, they are initially tagged as GUEST with authorized: false and are considered in a pre-authorization state.
Any attempt to access a webpage redirects the client to the External Portal Server. This server can process various types of authentication, such as:
- Identity Provider (IdP) authentication
- Payment systems
- Hotel-style guest authentication (e.g., room number and surname)
- Newsletter sign-up
Once the external portal handles the authentication, it can authorize the client via the Network API by sending a POST request after the client has completed the necessary steps.
API Workflow
-
Client Connects to SSID
The client connects to a Wi-Fi SSID with Hotspot > Captive Portal enabled. The client is tagged as GUEST and authorized: false by default. -
Redirect to External Portal Server
When the client attempts to access a webpage, they are redirected to the External Portal Server. The server is provided with the client's MAC address and SSID, which can be used for authorization.
The External Portal Server can learn the clientId of a connecting device by parsing query parameters from the redirect URL:
http://PATH_TO_EXTERNAL_PORTAL/guest/s/default/?ap=94:2a:6f:d0:30:57&id=1c:71:25:63:e4:24&t=1742398732&url=http://netcts.cdn-apple.com%2F&ssid=dph-guest
-
ap= MAC address of the UniFi AP -
id= MAC address of the client device -
url= original redirect target -
ssid= SSID the client connected to - Using the client MAC address, the external service can call:
GET/v1/sites/{siteId}/clients filter=macAddress.eq('AA:AA:AA:AA:AA:AA')
This returns a client object which includes theclientIdneeded to authorize them.
-
-
External Portal Server Authorizes the Client
After completing authentication, the external portal sends a POST request to the Network API to authorize the client. The request may include options like time limits, data usage limits, and rate limits. -
Authorization Confirmation
Once the authorization process is complete, the client’s status is updated to authorized: true. The updated client information is available in the Network API.
Authorization Flow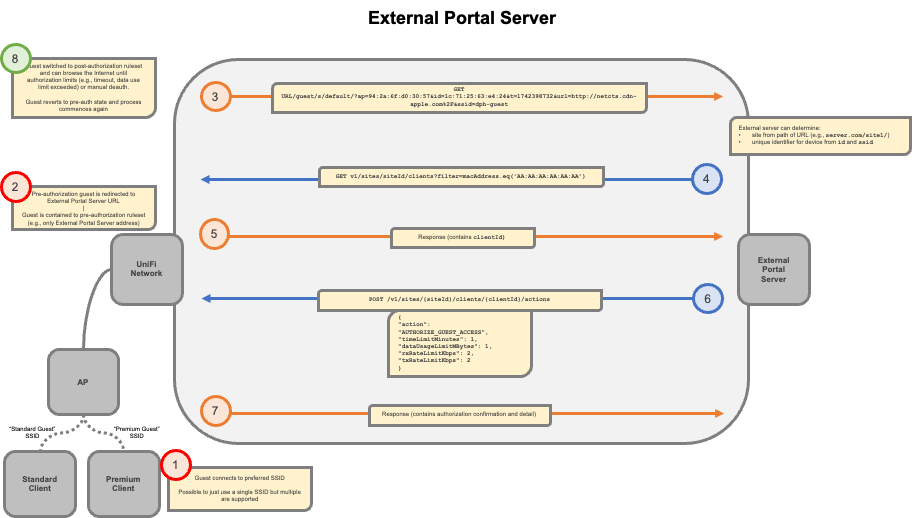
API Endpoints
1. Get Sites
GET /v1/sites
This endpoint returns a list of sites managed by the Network Application. In the case of a Cloud Gateway, only one response will be returned with the site ID.
Example Response:
[
  {
    "id": "siteId",
    "name": "Site Name"
  }
]
2. Get Clients on a Site
GET /v1/sites/{siteId}/clients
This endpoint retrieves a list of clients on a specified site.
Example Response:
{
  "type": "WIRELESS",
  "id": "clientId",
  "name": "Apple iPad Pro",
  "macAddress": "42:8a:f7:3c:50:b0",
  "access": {
    "type": "GUEST",
    "authorized": false
  }
}
3. Authorize Client
POST /v1/sites/{siteId}/clients/{clientId}/actions
This endpoint authorizes a guest’s access to the network by sending a POST request with the desired settings. You can configure options like time limits, data usage limits, and rate limits.
Example Request Body:
{
  "action": "AUTHORIZE_GUEST_ACCESS",
  "timeLimitMinutes": 120,
  "dataUsageLimitMBytes": 500,
  "rxRateLimitKbps": 100,
  "txRateLimitKbps": 100
}
4. Get Authorized Client Information
GET /v1/sites/{siteId}/clients/{clientId}
This endpoint retrieves updated client details, including their authorization status.
Example Response:
{
  "access": {
    "authorized": true,
    "authorization": {
      "authorizedAt": "2025-03-19T11:20:44Z",
      "expiresAt": "2025-03-19T13:00:44Z",
      "dataUsageLimitMBytes": 500
    }
  }
}
Guest Captive Portal with Wired Clients
The Hotspot zone is included in the Zone-Based Firewalls by default, providing a ready-to-use policy for redirecting guests through the captive portal.
You can configure a GuestLAN for wired clients, ensuring they are directed to the same captive portal experience as wireless guests. This creates a consistent guest experience across both wireless and wired connections.
-
Set Up a New Network
Create a new network dedicated to guests (e.g., GuestLAN) and set the zone to Hotspot.
-
Validate in the Zone-Based Firewall Table
Check that the Hotspot zone is applied to the appropriate network. If it isn’t, manually assign it by selecting the Hotspot Zone in the Zone-Based Firewall settings.
-
Connecting Wired Clients
Any clients connecting to ports assigned to the GuestLAN network will be subject to the same captive portal as wireless clients.